

- What’s VPS administration and why automate it?
- What are the instruments for automating VPS administration?
- The best way to arrange your VPS administration workflow
- Sensible VPS automation examples
- 1. Monitoring server standing
- 2. Backup logging
- 3. Reporting malware scan outcomes
- 4. Detecting utilization spikes
- The best way to scale your n8n VPS automation
- Greatest practices for automating VPS administration
- What’s subsequent after automating your VPS administration?

Automating Hostinger digital non-public server (VPS) administration utilizing n8n and our public API helps streamline repetitive duties, comparable to monitoring uptime and sending alerts on Slack. Along with making the duty extra environment friendly, it reduces human errors and lets you give attention to essential duties that require extra advanced configurations, like fine-tuning firewall guidelines.
You may accomplish this utilizing two key instruments: n8n, a strong open-source low-code automation platform, and the Hostinger API, which gives the programmatic interface to handle your servers, on this case via n8n. The method of automating your VPS duties with these instruments is simple:
- Get your Hostinger API token from hPanel.
- Arrange or self-host an n8n occasion and join your Hostinger API by including the API token because the HTTP request node’s authentication credential.
- Configure your n8n workflow utilizing particular API endpoints and nodes based mostly on the VPS administration duties you need to automate.
Examples of straightforward duties that may be automated utilizing n8n and the Hostinger API embody alerting you to downtime, logging the newest backup for historic knowledge, notifying you of doubtless compromised VPS, and creating Jira tickets for visitors spikes.
Earlier than diving into constructing these workflows, let’s discover the fundamentals by understanding the instruments that make this automation doable.
What’s VPS administration and why automate it?
VPS administration includes overseeing and sustaining the efficiency, safety, software program, and system updates of a digital server. It consists of duties comparable to configuring server settings, monitoring uptime, managing storage and backups, and making use of safety patches.
Correct VPS administration is important to make sure easy, dependable, and safe operations. Nevertheless, it may be time-consuming, repetitive, and liable to human error – particularly as you add extra servers.
Automating VPS administration can streamline routine duties, scale back threat, and liberate time for extra strategic work, amongst different advantages.
Advantages of automating VPS administration
Automating your VPS administration duties with n8n and the Hostinger API delivers varied advantages that stretch past easy effectivity, impacting reliability, consistency, and useful resource allocation.
- Vital effort and time financial savings. By automating operations like fetching day by day useful resource metrics and logging malware scan outcomes, you may give attention to advanced duties that require extra human judgment or intervention.
- Drastically diminished downtime. Creating an automatic monitoring and alerting system lets you establish points in your VPS and reply to them promptly. The automation’s capability to run 24/7 with out supervision ensures instant detection of interruptions or anomalies.
- Minimized human errors and improved knowledge consistency. Performing guide, repetitive administrative duties is inherently liable to human error. Automated and examined workflows constantly carry out the identical steps, making certain knowledge consistency.
- Streamlined multi-VPS administration. Directors can monitor and obtain alerts about a number of VPS cases on a centralized hub. The n8n-Hostinger API integration can also be scalable, that means you may simply broaden your workflow to automate duties throughout a number of server cases.
What are the instruments for automating VPS administration?
Automating Hostinger VPS administration requires two instruments: n8n and our public API.
n8n runs the workflow for automating the duty, whereas the API facilitates the communication between the automation platform and your VPS.
What’s n8n?
n8n is an open-source platform that permits you to automate varied duties by connecting completely different functions and setting customized logic to govern knowledge because it strikes.
In automated VPS administration, n8n fetches knowledge out of your VPS by way of API, filters it in response to particular guidelines, and executes a predefined sequence of actions if sure circumstances are met.
What makes n8n appropriate for this process is its low-code nature. This implies you don’t must be an expert developer to construct refined server administration workflows.
You may construct workflows in n8n by dragging and dropping nodes. Every node performs a selected operate, whether or not it’s sending an API name, setting a filter rule, sending a notification on third-party apps, or scheduling process execution.
Vital! n8n isn’t a drop-in substitute for instruments like Grafana and Prometheus because of the lack of options particularly designed for server monitoring. Nevertheless, it’s a extra beginner-friendly choice for fundamental duties like alerting and is far simpler to make use of, particularly for non-developers.
What’s Hostinger’s API?
Hostinger’s public API is a instrument that lets you work together along with your Hostinger account and merchandise programmatically. It permits your third-party functions, comparable to n8n, to attach and change knowledge along with your Hostinger account, together with the related VPS.
The Hostinger API is essential for automating VPS administration as a result of it allows n8n to fetch knowledge out of your server, which is important for figuring out whether or not the duties must be carried out.
APIs usually have a number of endpoints – addresses that assist you to request explicit knowledge or take a selected motion. For instance, Hostinger API has endpoints that allow you to fetch knowledge about backup, VPS info, and malware scanner abstract, amongst others.
Hostinger API endpoints are additionally useful for administering varied features of your server. As an example, you may create a brand new Docker mission or set a brand new firewall rule with out instantly interacting along with your VPS. To be taught extra about all out there endpoints and their utilization, confer with our API documentation.
The best way to arrange your VPS administration workflow
By integrating n8n and the API from Hostinger, you may arrange a VPS administration automation workflow in solely three easy steps.
1. Generate your Hostinger API token
The API token is a singular authentication key that enables the Hostinger system to confirm requests coming from third-party sources, like n8n.
Producing an API key at Hostinger takes these easy steps:
- Log in to hPanel.
- Click on your account icon on the highest proper nook of your display and choose Account info.
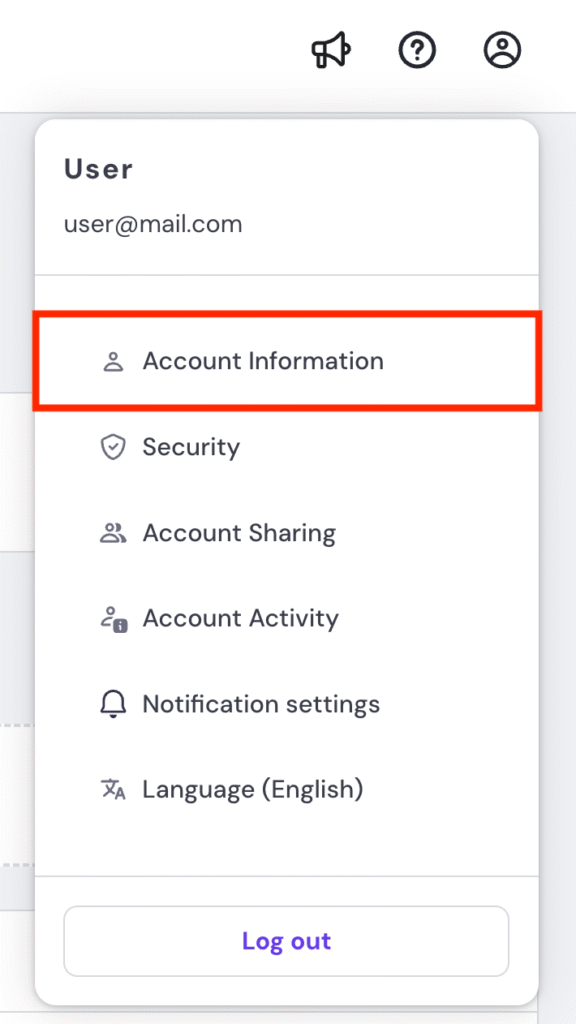
- Choose API from the left sidebar.
- Click on New token.
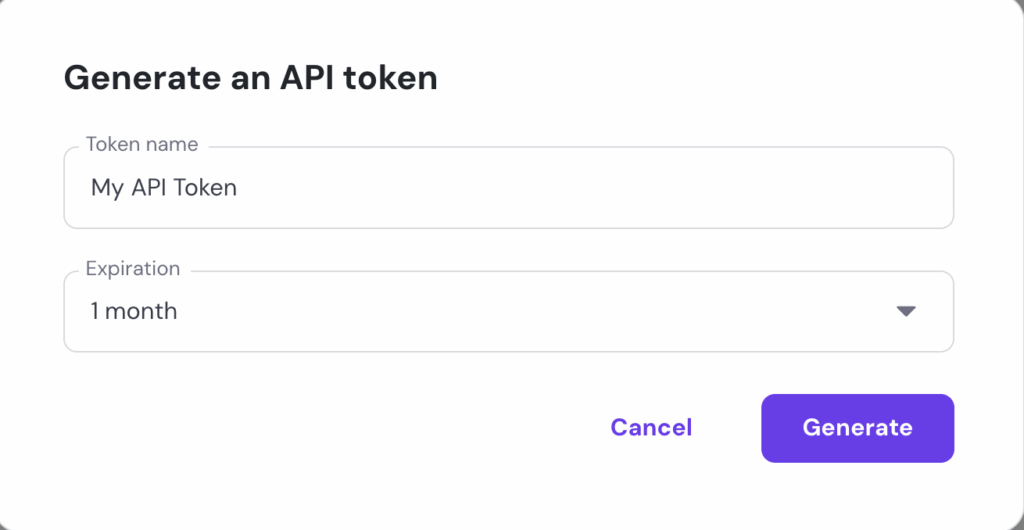
- Add a reputation on your token and choose an expiration date. Hit Generate.
Copy the generated token and retailer it in a secure location, like an encrypted password supervisor. That is necessary since you gained’t be capable to see it once more after closing the API token technology web page.
Maintaining the token secure prevents this credential from being compromised, which is essential since cybercriminals can use it to acquire delicate knowledge or modify vital server settings.
Vital! Along with storing your token in a secure location, selecting a shorter expiration date safeguards your API token. The extra ceaselessly you replace your token, the harder it turns into for cybercriminals to acquire a legitimate one.
On the identical time, nonetheless, updating your token ceaselessly may be tedious. In that case, select an expiration interval that finest balances safety and upkeep in response to your wants.
After acquiring your API token, let’s verify whether or not it really works correctly. You may simply do that by copying instructions on the backside of the token technology web page and operating them in your laptop’s command-line utility.
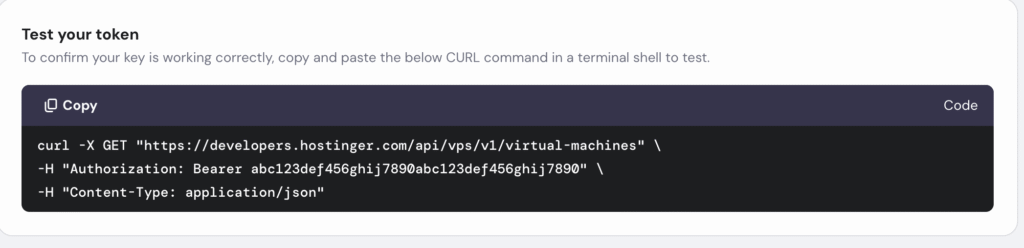
If you happen to don’t obtain any error message, it means the API token is legitimate, and we will proceed with organising n8n.
After verifying the API token, acquire your VPS ID, which the API will use to establish the server and fetch the information. Right here’s how to take action:
- Go to hPanel → sidebar → VPS.
- Click on Handle on the VPS you need to monitor.
- Verify the web page URL. Your VPS ID is the quantity subsequent to /vps. On this URL instance, the ID is 123456:
https://hpanel.hostinger.com/vps/123456/overview
2. Arrange n8n in your VPS
You may arrange n8n utilizing two strategies: manually on a self-hosted surroundings or utilizing the official cloud plan.
We advocate self-hosting n8n in a VPS. Not solely is that this technique less expensive than the cloud plan, nevertheless it additionally offers you full management over the internet hosting surroundings and your knowledge, leading to a better degree of flexibility.
Vital! Keep away from internet hosting your n8n occasion on the identical VPS you need to monitor as a result of your workflow may also fail if the server experiences downtime.
As well as, VPS suppliers provide varied options that assist you to configure and handle your n8n occasion extra simply. For instance, Hostinger’s self-hosted n8n plan gives OS templates that allow you to deploy n8n with just some clicks, all with none instructions.
If you wish to see this template in motion or discover ways to manually deploy this automation platform, take a look at our tutorial on installing n8n.

As soon as n8n is deployed, use the API to attach this instrument to your VPS.
3. Join n8n to Hostinger
Connecting n8n to Hostinger by way of API includes organising the token because the HTTP node’s authentication technique. Right here’s how you can do it:
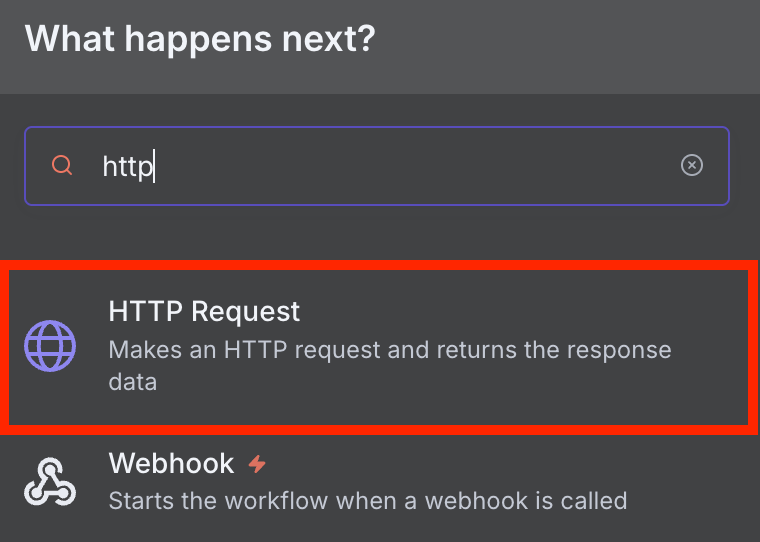
- Open and log in to your n8n occasion.
- On the principle web page, click on Create Workflow within the high proper nook.
- Click on the plus icon to convey up the node selector. From this menu, select HTTP request.
- Within the URL area, enter your API endpoint. For testing, use the next endpoint, with 123456 being your precise server ID:
https://builders.hostinger.com/api/vps/v1/virtual-machines/123456
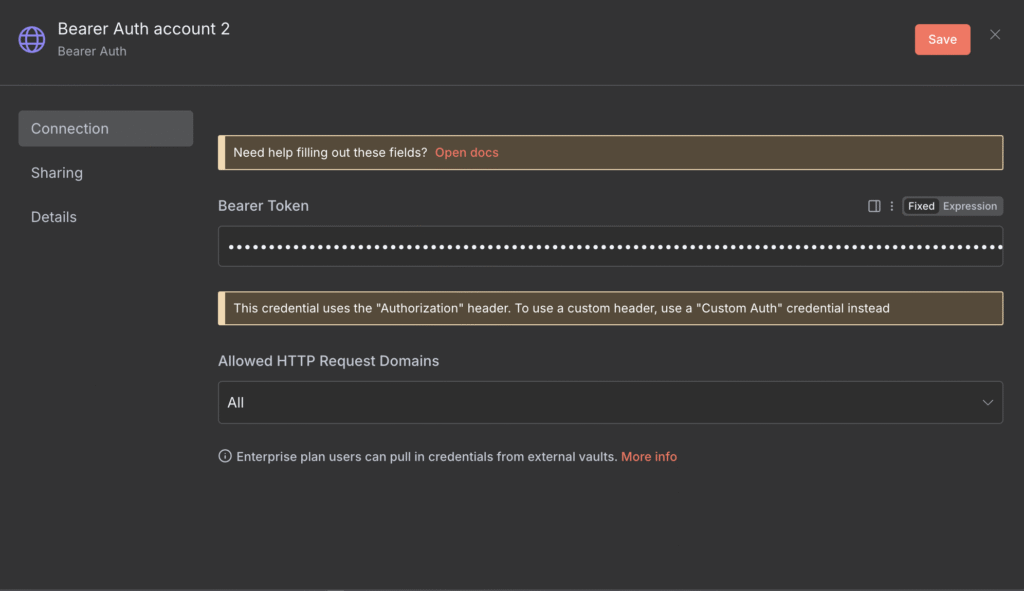
- Open the Authentication menu, click on Generic Credential Kind.
- Choose Bearer auth.
- Develop the Bearer Auth dropdown menu and click on Create new credential.
- On the credential creation menu, enter your API token into the Bearer Token area and hit Save.
This HTTP node is now linked to your VPS by way of the Hostinger API. Verify if the mixing works correctly by clicking the Execute step button.
If the node’s proper pane reveals particulars about your VPS, the mixing is profitable. In any other case, there is perhaps points like:
- Incorrect VPS ID. Verify your VPS ID towards the information on hPanel. If it’s incorrect, the API can’t discover the vacation spot to ship the HTTP request.
- Misconfigured credential. Be sure you enter the right API key. Additionally, use Bearer Auth because the node’s authentication technique.
- Expired API token. Use a contemporary API token as a result of the older one may already be expired and invalid. If you happen to misplaced the earlier key, merely regenerate a brand new one.
- Fallacious or mistyped endpoint. Confirm in case you use the right endpoint. A kind may cause the endpoint to be invalid, whereas utilizing a distinct endpoint may cause errors as a result of it could require particular parameters.
After you have a working integration, create an precise workflow by including and connecting extra nodes. There are numerous duties you may automate with n8n and the Hostinger API, however we’ll discover the only ones within the following part.
Sensible VPS automation examples
Listed below are a number of examples of straightforward VPS administration duties you may automate with n8n and the Hostinger API.
1. Monitoring server standing
You may create a workflow that always screens your server standing and alerts you of potential downtime on a third-party app. This lets you take the required actions instantly as quickly as a problem arises.
To realize this, you could retrieve the server standing utilizing the API and set a rule that triggers alerts if the standing signifies downtime. Right here’s how you can create it:
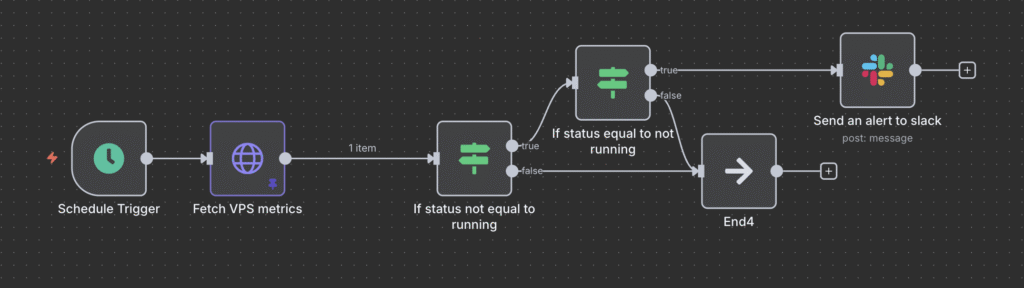
- Add the On schedule set off to find out when the workflow will fetch the server standing. Within the configuration window, set the frequency in response to your wants.
- Join and configure an HTTP request node. Use the next endpoint, however bear in mind to exchange the server ID with the precise worth:
https://builders.hostinger.com/api/vps/v1/virtual-machines/123456
- Set Bearer auth because the authentication technique.
- Add the If node to filter the server standing. Set a rule with this situation:
- {{ $json.state }} is just not equal to operating
- Join the False situation to the Do nothing node to finish the workflow.
- For the True situation, join one other If node and set the VPS standing that can set off the alert. You may set a number of guidelines with an OR situation, comparable to:
- {{ $json.state }} is the same as stopped
- {{ $json.state }} is the same as destroyed
- {{ $json.state }} is the same as suspended
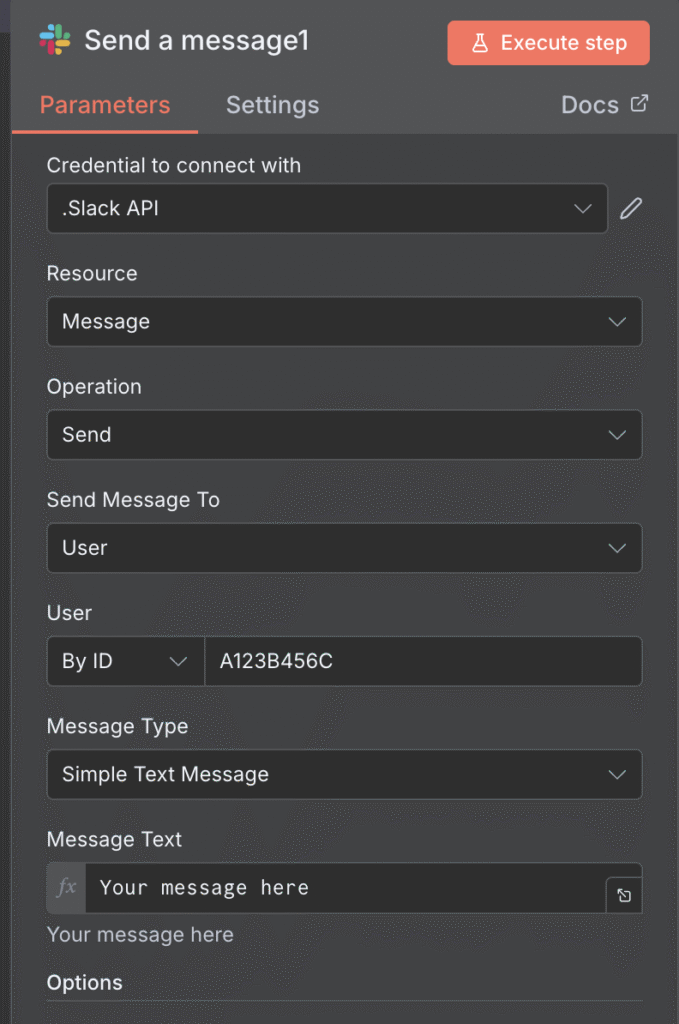
- Join the True situation with the platform the place you need to obtain the alert. For instance, use the Slack: Ship a message node.
- Combine your Slack account and choose the channel or consumer to whom you need to ship the alert. To be taught extra in regards to the steps, take a look at n8n’s official information on configuring Slack credentials.
- Enter the notification message. For instance, you may cross the present server standing dynamically utilizing the next:
⚠️**Essential!** Potential downtime detected. Server standing: {{ $json.state }}
Vital! When selecting the situation on your If node, take note of the kind of knowledge you’re working with, whether or not it’s a string, array, object, or one other kind.
The finished workflow seems like this:
Notice that this workflow will nonetheless provide you with a warning throughout deliberate downtime, like a scheduled upkeep or deliberate restart, as a result of it reveals the stopped standing.
To get round this, join the if and wait node to set a logic that alerts you if the downtime lasts longer than the standard upkeep length. Alternatively, you may pause the workflow by evaluating the execution time and your restart schedule listed on a platform like Jira.
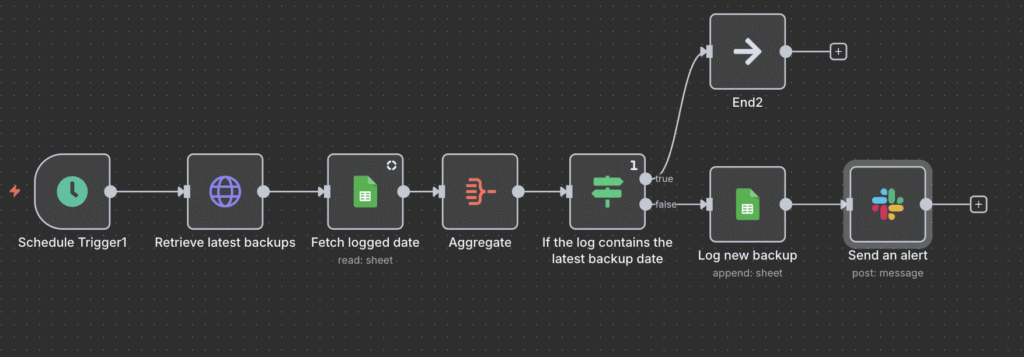
2. Backup logging
Automating backup logging lets you monitor the out there restoration factors of your server, making certain knowledge integrity. You may as well arrange an alert to inform you every time the newest computerized backup is logged.
You may accomplish this by retrieving the newest backup date from the Hostinger system and evaluating it to the dates within the logs in a Google sheet. Right here’s how you can do it:
- Add the On schedule set off to set the time when your workflow will begin.
- Join and configure the HTTP request node with the next endpoint:
https://builders.hostinger.com/api/vps/v1/virtual-machines/123456/backups
- In accordance with the endpoint specification, add a question parameter named web page and set its worth to 1.
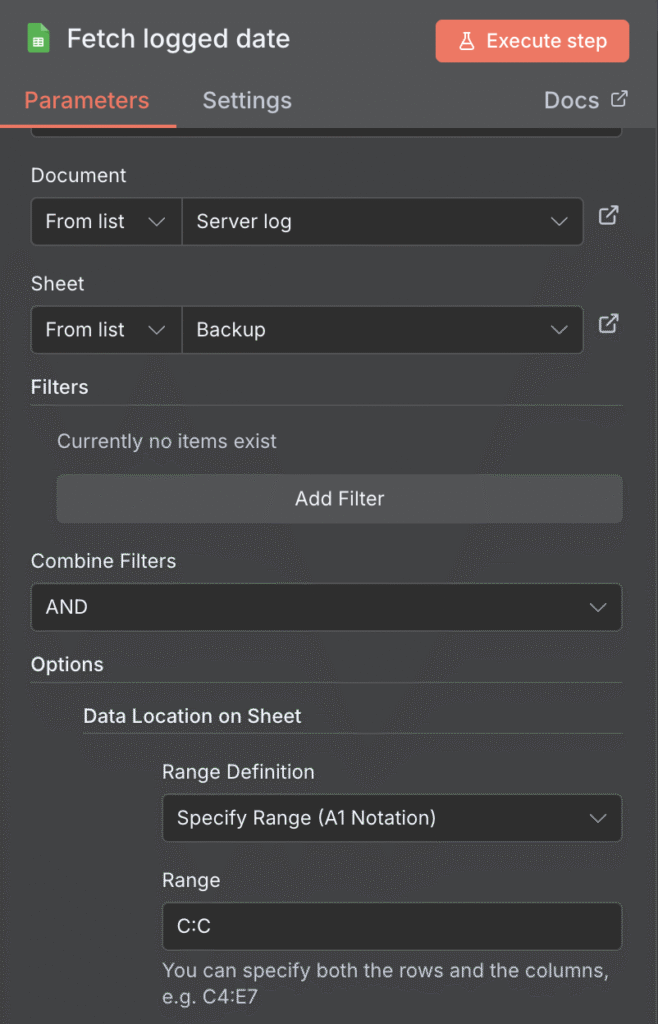
- Add the Google Sheets get row node and connect n8n to your spreadsheet the place you log the backup date.
- Click on Add choice and choose Knowledge Location on Sheet.
- Choose Specify Vary (A1 Notation) because the Vary Definition.
- Enter the column the place you log the backup date because the Vary. For instance, enter C:C if the dates are within the C column.
- Join the Combination node to consolidate the logged dates into an array.
- Add an If node with the next configuration. This implies the situation equals True if the sheet already has the newest backup date:
- {{ $json[‘Creation date’] }} incorporates {{ $(‘API GET’).merchandise.json.knowledge[1].created_at.toDateTime().format(‘yyyy-MM-dd HH mm ss’) }}
- Join the True situation to the Do nothing node and False to a Google Sheets append row node.
- Open the Google Sheets append row node and join it to the identical spreadsheet.
- Beneath the Worth to ship part, specify the columns you need to populate with knowledge from the API. For instance, in case you want to log the backup ID, measurement, and date, the fields are:
- ID – {{ $(‘API GET’).merchandise.json.knowledge[1].id }}
- Dimension – {{ $(‘API GET’).merchandise.json.knowledge[1].measurement }}
- Date – {{ $(‘API GET’).merchandise.json.knowledge[1].created_at.toDateTime().format(‘yyyy-MM-dd HH mm ss’)}}
- Join the Google Sheets append row node to the Slack ship a message node to configure the alerting system. For instance, use the next message:
✅**Backup logged!** Newest backup is added to the log.
Vital! If you happen to can’t see the columns within the Google Sheets node, be sure you chosen the right sheet and created the columns beforehand.
The finished workflow seems like this:
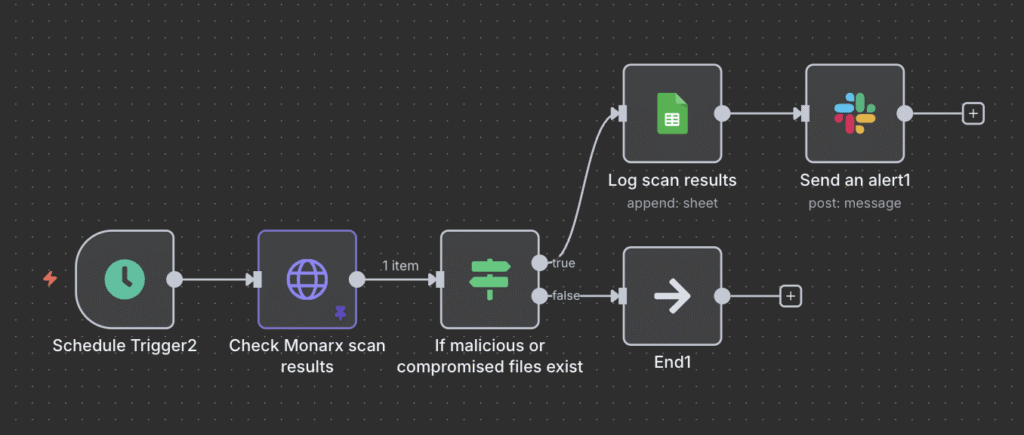
3. Reporting malware scan outcomes
Hostinger VPS options built-in Monarx anti-malware, permitting for computerized scans. You should use the API to fetch scan outcomes, create logs for safety audits, and ship notifications when malicious recordsdata are discovered.
Right here’s how you can create the workflow:
- Add the On schedule set off.
- Join and configure the HTTP request node. Use the next endpoints:
https://builders.hostinger.com/api/vps/v1/virtual-machines/123456/monarx
- Add the If node and set the filtering guidelines. For instance, enter the next to set the situation as True if the scan outcome detects any malicious file:
- {{ $json.malicious }} is larger than 0
- If you wish to get an alert about any compromised file, embody this extra rule in the identical node with OR situation:
- {{ $json.compromised }} is larger than 0
- Join the False level to the Do nothing node.
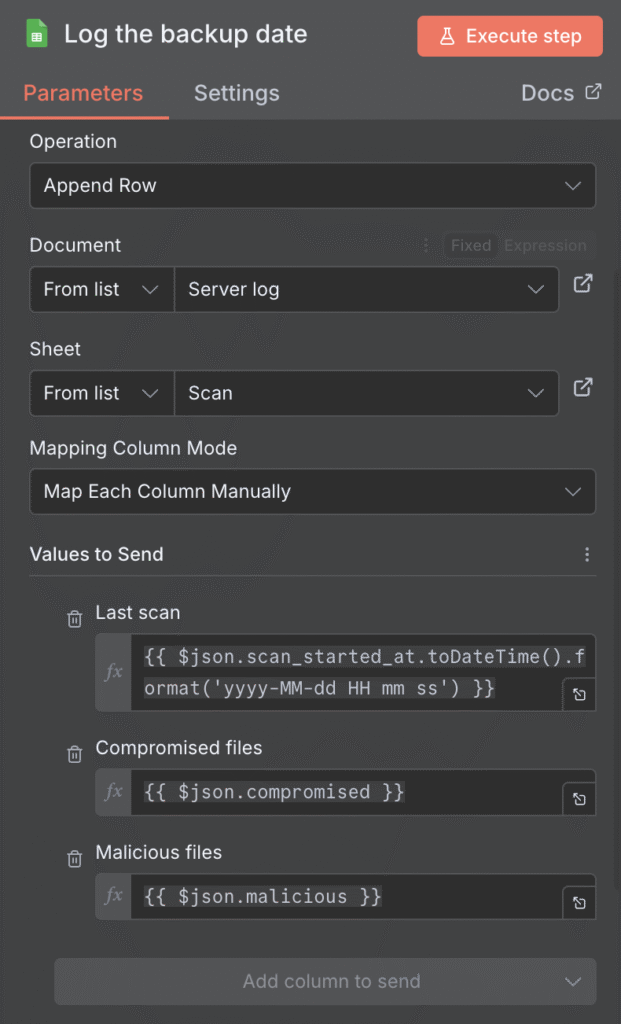
- Add the Google Sheets append row node to the True situation.
- Go to your Google Workspace and create a Google sheet with these three columns on your knowledge:
- Final scan – the date of the newest scan.
- Compromised recordsdata – the variety of detected compromised recordsdata.
- Malicious recordsdata – the variety of scanned malicious recordsdata.
- Return to your n8n canvas. Then, join your scan log spreadsheet and enter the information you need to write into every column. For instance, we have now three columns with these values:
- Final scan – {{ $json.scan_started_at.toDateTime().format(‘yyyy-MM-dd HH mm ss’) }}
- Compromised recordsdata – {{ $json.compromised }}
- Malicious recordsdata – {{ $json.malicious }}
- Add and configure the Slack ship a message node to ship the notification, comparable to:
⚠️**Essential!** Final Monarx scan detected {{ $json.malicious }} malicious recordsdata and {{ $json.compromised }} compromised recordsdata.
Your completed workflow seems one thing like this:
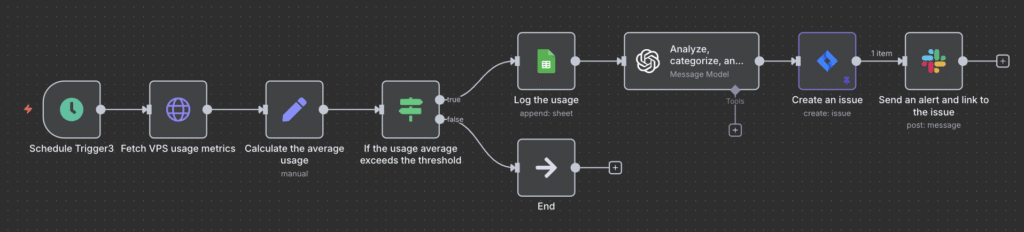
4. Detecting utilization spikes
Automating useful resource utilization monitoring lets you obtain automated alerts in case your server load exceeds particular thresholds and mechanically creates points on Jira for additional investigation.
To realize this, use the API to fetch utilization knowledge, set a rule to find out whether or not it exceeds the traditional threshold, and notify you of overly excessive masses.
Notice that this workflow is considerably extra advanced than the earlier ones, because it includes modifying the JSON in transit and requires interplay with further exterior techniques. For instance, our particular setup requires the OpenAI and Jira APIs, in addition to permission to your Jira workspace.
We’ll use the OpenAI API to attach an LLM into our workflow to research the utilization spike. Then, we use the Jira API to create a problem in our workspace utilizing the AI evaluation outcomes.
Right here’s how you can create the workflow:
- Add the On schedule set off node.
- Join and arrange the HTTP request node with the next endpoint:
https://builders.hostinger.com/api/vps/v1/virtual-machines/1268054/metrics
- Add two question parameters to decide on the time vary for getting the server useful resource utilization. For instance, use these to fetch the utilization of the previous 24 hours:
- date_from – {{ $now.minus(24 ‘hours’) }}
- date_to – {{ $now }}
- Join the Edit area node to calculate the typical useful resource utilization. Add the next fields:
- cpu_usage.avg – {{ $json.cpu_usage.utilization.values().common() }}
- ram_usage.avg – {{ $json.ram_usage.utilization.values().common() }}
- out_traffic.avg – {{ $json.outgoing_traffic.utilization.values().common() }}
- inc_traffic.avg – {{ $json.incoming_traffic.utilization.values().common() }}
- Add the If node to find out whether or not the typical useful resource utilization exceeds a selected worth. The principles look as follows, however you may change the edge based mostly in your wants:
- {{ $json.cpu_usage.avg }} is larger than 1
- {{ $json.ram_usage.avg }} is larger than 20000000
- {{ $json.out_traffic.avg() }} is larger than 5000
- {{ $json.inc_traffic.avg }} is larger than 5000
- Join the False situation to the Do nothing node and True to the Google Sheets append row node.
- Go to your Google Workspace and create a Google sheet with 5 columns to log your server utilization knowledge:
- Date – the date the server utilization knowledge is fetched.
- CPU avg – the typical CPU utilization.
- RAM avg – the typical RAM consumption.
- Out avg – the typical variety of outgoing visitors.
- Inc avg – the typical variety of incoming visitors.
- Configure the Google Sheets append rows node and join the spreadsheet the place you need to log the historic server utilization. Set these values to ship:
- Date – {{ $now.format(‘yyyy-MM-dd HH mm ss’) }}
- CPU avg – {{ $json.cpu_usage.avg }}
- RAM avg – {{ $json.ram_usage.avg }}
- Out avg – {{ $json.out_traffic.avg }}
- Inc avg – {{ $json.inc_traffic.avg }}
- Join the OpenAI ship a message node and join your account by configuring the OpenAI credentials.
- Choose your most well-liked AI mannequin and add a immediate with Person because the Position to categorise the server useful resource utilization. For instance:
Analyze the next 24-hour useful resource utilization metric of my VPS:

CPU common: {{ $json['CPU avg'] }}

RAM common: {{ $json['RAM avg'] }}

Outgoing visitors common: {{ $json['Out avg'] }}

Incoming visitors common: {{ $json['Inc avg'] }}

Classify whether or not the utilization is mildly regarding, regarding, or vital
Based mostly in your classification, establish potential causes and actionable steps for minimizing the utilization.
- Add one other immediate, however this time choose System because the Position to set the way you need the AI to reply. As an example:
Format your evaluation as follows:

The utilization is: excessive/medium/regular

I establish the issue lies in your (areas the place the difficulty that causes the spike)

I counsel you do the next:

1. Answer 1

2. Answer 2
- Scroll down and allow Output Content material as JSON and Simplify Output settings to course of the AI output extra simply later.
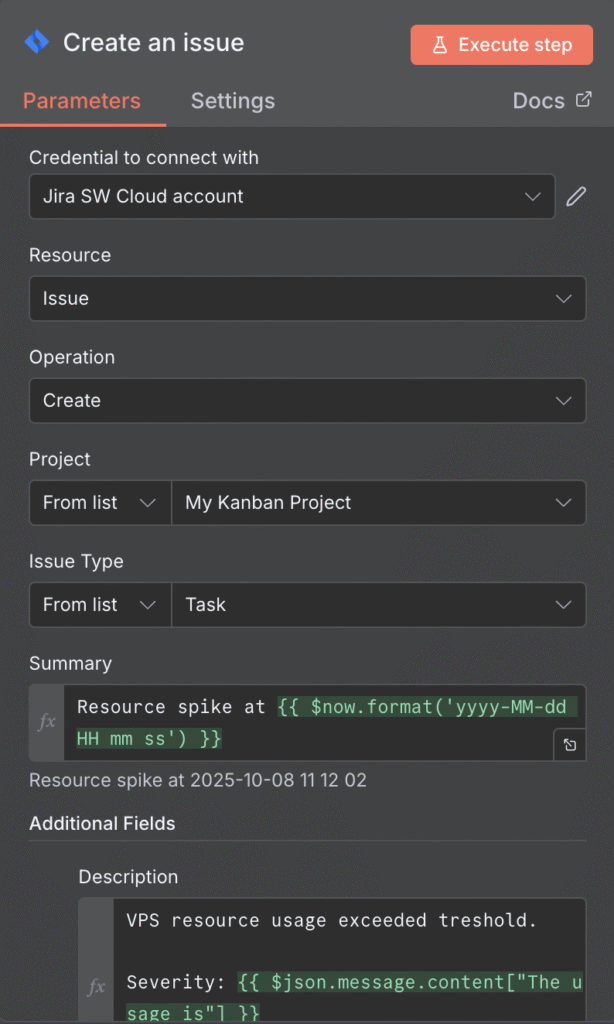
- Join the Jira create a problem node and configure the Jira credentials to attach your workspace with n8n. This node will mechanically create a Jira ticket for additional decision of this downside.
- Choose the Venture the place you need to create the difficulty and set the Abstract for the ticket. You may embody the date when the difficulty is created, like so:
Useful resource spike at {{ $now.format('yyyy-MM-dd HH mm ss') }}
- Click on Add fields to incorporate extra info in your ticket. For instance, add Description to place particulars in regards to the AI evaluation to your Jira situation:
VPS useful resource utilization exceeded the edge.

Severity: {{ $json.message.content material["The usage is"] }}

Potential causes: {{ $json.message.content material["I identify the problem lies in your"] }}

Prompt options: {{ $json.message.content material["I suggest you to do the following"] }}
- Arrange the Slack ship a message node to configure the place and the way you need to obtain the alert. Then add the notification message, like:
⚠️**Essential!** VPS useful resource utilization exceeded threshold. Robotically created Jira situation on: {{ $json.self }}
A completed workflow seems like this:
Vital! Since AI is unpredictable, typically every output is formatted otherwise. If this occurs, your JSON may not cross the information accurately as a result of the placeholder, comparable to The utilization is in {{ $json.message.content material[“The usage is”] }}, adjustments.
Within the workflow, we already minimized this situation by offering the output format that the AI will observe as a System immediate. Nevertheless, it’s essential to check the workflow totally to make sure the output stays constant.
The best way to scale your n8n VPS automation
The Hostinger API gives further endpoints that allow you to scale your n8n workflow to automate a broader vary of duties past easy standing monitoring. You may verify the entire checklist of endpoints within the API documentation web page, amongst them:
- Snapshot. Allows you to create, get, and delete a snapshot of your VPS. This lets you create a workflow that mechanically creates a restoration level of your server earlier than a scheduled main system upkeep.
- Firewall. Allows you to handle varied features of your VPS firewall and its guidelines. For instance, you may create a workflow that quickly disables stale or unused guidelines to cut back efficiency overhead throughout visitors spikes.
- Docker. Lets you work together with our built-in Docker Supervisor instrument to handle your containerized companies. Utilizing this endpoint, you may mechanically cease a container throughout a scheduled replace or safety audit.
- Actions. Retrieves detailed details about actions in your VPS. That is useful for making a workflow that mechanically alerts you about suspicious exercise.
n8n additionally gives varied different nodes that allow you to course of knowledge extra flexibly and combine completely different functions into your workflow.
For instance, you may add the PagerDuty node to arrange a extra sturdy catastrophe and incident administration course of. You may as well join a number of workflows for various duties collectively to create a unified, scalable automation system.
Combining varied n8n nodes and Hostinger API endpoints lets you create a custom-made automation system tailor-made to your particular wants, which brings quite a few advantages.
n8n-Hostinger integration limitation
Whereas combining n8n and the Hostinger API gives highly effective automation capabilities, it’s important to grasp that this method has inherent limitations.
For one, duties you may automate are restricted to what the Hostinger API endpoints provide. Whereas we constantly add extra performance to the API, some vital duties should be finished instantly on the system for safety causes.
This limitation additionally implies that you can’t create a completely self-healing automation workflow that takes corrective actions independently upon encountering errors. Even when the API permits it, growing a self-healing automation may be difficult as a result of it could carry out actions that may break the system, like shutting down a vital service to liberate assets throughout a visitors spike, if not examined fastidiously.
Whereas Hostinger API is at the moment not appropriate for advanced self-healing automation, it gives endpoints for fundamental administration duties like restoring a backup, altering a nameserver, or importing SSH keys.
Greatest practices for automating VPS administration
Following finest practices when utilizing n8n and the Hostinger API to automate VPS administration is essential to sustaining optimum safety and workflow performance.
Listed below are a number of best practices when using n8n to automate duties:
- Safe your workflow. Safeguard all credentials, comparable to API tokens and utility passwords, to forestall unauthorized events from accessing them. Whereas n8n masks all delicate info and restricts entry to the credential homeowners by default, be certain that to make use of an encrypted platform like NordPass in case you retailer them domestically.
- Observe VPS security practices. Along with your workflow, your n8n internet hosting surroundings should stay safe. A compromised server can expose your automation platform to safety dangers and interruptions.
- Use n8n queue mode. In case you have a fancy automation system involving a number of workflows, think about using the n8n queue mode. It distributes processes to a number of employees for extra environment friendly execution, particularly helpful for much less highly effective VPSes.
- Deal with errors correctly. Create an automatic notification to catch errors in your VPS monitoring workflow. To do that, use n8n’s built-in Cease and Error node and the Error Set off.
- Replace n8n repeatedly. Set up the most recent model of n8n as quickly as it’s launched to take care of optimum safety and performance. Consult with our tutorial on putting in n8n for extra info on the steps.
- Take a look at and doc your workflow. Completely check your workflow, ideally in a devoted staging surroundings, to make sure it really works correctly earlier than the deployment. Additionally, doc all features of your workflow so you may establish errors and add extra performance extra simply.
- Take into account the API fee restrict. APIs generally restrict how ceaselessly you should use them to forestall misuse and exploitation. Keep away from operating your workflow too usually, comparable to each hour, as it could trigger points.
What’s subsequent after automating your VPS administration?
Combining n8n and the Hostinger API lets you streamline repetitive duties and reduce human error, leading to extra environment friendly VPS administration.
After understanding what n8n and the Hostinger API can obtain, it’s time to discover varied endpoints and nodes to find out the simplest method to automate your VPS administration.
Along with an API, Hostinger gives an MCP-powered Kodee AI assistant to simplify VPS administration additional. Because it gives extra intensive capabilities than the API, it makes a wonderful complement to your automation system.
For instance, you may restart companies by merely chatting with the AI assistant. Like our API, you should use Kodee at no cost, which can also be pre-configured in your VPS.
The entire tutorial content material on this web site is topic to
Hostinger’s rigorous editorial standards and values.

Aris is a Content material Author specializing in Linux and WordPress growth. He has a ardour for networking, front-end net growth, and server administration. By combining his IT and writing expertise, Aris creates content material that helps individuals simply perceive advanced technical matters to begin their on-line journey. Observe him on LinkedIn.

